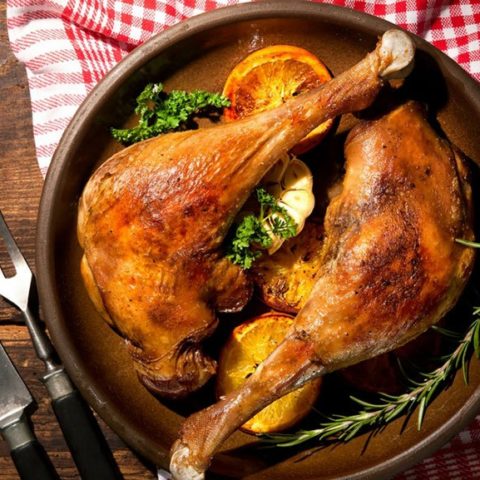
Fried Goose Recipe
I have seen and cooked several goose recipes before, and they are all rather complicated. Usually, the list of ingredients is considerable, and it seems more trouble than what it is worth. On top of that, there are not a lot of decent fried goose recipes, but this recipe is the exception. The best cut for frying is the breast, and I think the recipe above is probably the simplest you will find. It also tastes the best. It is something I have combined techniques for, modified and changed over the years, so it is original.
Ingredients
- 2 goose breasts
- Salt
- Pepper
- Garlic powder and Cajun seasoning to taste
- 1/4 cup of flour
- 1/4 cup of bacon grease
- Whole milk
- Whisk
- Iron skillet of thick bottomed pan suitable for frying
Instructions
Assuming the serving size is two, you will need two goose breasts. The clear covering and gray skin all over the breasts will make your goose a disaster if it is not removed. Prior to remove you will need two kitchen utensils, possibly three. The following is what you need:
A very sharp filet knife, and I would suggest using a fish filet knife like this one.
If you do not use to cutting meat or possess poor knife skills, then it is best to play it safe and wear a filet glove on the hand you are not cutting with. This is a perfect example of a good filet glove.
Finally, you will need a meat tenderizer, also known as a meat mallet, like this one.
A fish filet knife is preferable to a butcher's knife because it is flexible, and it is designed to remove very thin layers of anything unwanted in your final dish. The gray and clear skin are tough but very thin, so I choose to use a filet knife when I remove it.
The glove is to keep you from cutting your fingers and hand. The knife has to be razor sharp, and even experienced butchers take no chances. This is the goose, so it is fatty and greasy. It is also not something you probably have a lot of practice preparing, so the number one rule in the kitchen is safety.
I said earlier goose meat did not require chemical or mechanical tenderizing, and it doesn't. You will be using the flat portion to even out the pieces after you have finished properly cleaning them. Deep fried or pan fried food, especially meat, should be as even in thickness all over as much as possible. Once I get to the frying part of our recipe, it would ruin the goose if part of it was cooked way more than another simply because it was smaller, and it didn't need as much time in 350 degrees Fahrenheit oil as the bigger, fattier portion of the breast. In short, our mallet is for shaping.
The steps for part one are very simple, and they go as follows:
You must remove all gray and clear coating on the surface and any veins running throughout.
The goose breasts must look like a flawless and picture perfect dark red like shown here.
Finally, use the flat portion of your mallet to pound out any larger pieces to make the breast look even.
Here is an alternative method: Use the flat part of the mallet to shape it evenly, and you can switch sides and pound the breast large and very thin to form a cutlet.I need to make a side note before listing the steps. Whenever I make bacon at home for any recipe, I save the bacon grease. If you do not have bacon grease, you can cube a package of bacon and render the fat out on low heat. Click the hyperlink on how to render fat. If you are shy a quarter cup of bacon grease, add simple cooking oil to make up the difference.
Season the breasts with all of the seasonings to taste depending on which flavor to dominate.
Add liberal amounts of each seasoning to the flour.
Shake the flour around well and sift it to create seasoned flour.
Add the grease to the skillet and heat it to 350 degrees Fahrenheit.
Dredge the breasts in the seasoned flour and shake off excess flour.
Fry each side of the duck breast for one minute.
Remove the breasts and place them on a platter with paper towels to absorb excess grease.Immediately after you remove the breasts, begin adding a tablespoon of the leftover seasoned flour for about every tablespoon of fat left in the pan.
You need to add the flour and stir each time to make sure it does not get too thick.
Once the flour and fat mixture become smooth, slowly whisk in small amounts of milk until you have your ideal consistency
If you had to cube bacon to render the fat out, add the bacon back into the gravy. It will be delicious, and it makes having to take the extra step of rendering worth it.
Immediately after you remove the breasts, begin adding a tablespoon of the leftover seasoned flour for about every tablespoon of fat left in the pan.
You need to add the flour and stir each time to make sure it does not get too thick.
Once the flour and fat mixture become smooth, slowly whisk in small amounts of milk until you have your ideal consistency
If you had to cube bacon to render the fat out, add the bacon back into the gravy. It will be delicious, and it makes having to take the extra step of rendering worth it.
Nutrition Information:
Yield: 2 Serving Size: 1Amount Per Serving: Calories: 463Total Fat: 36gSaturated Fat: 14gTrans Fat: 0gUnsaturated Fat: 19gCholesterol: 62mgSodium: 2036mgCarbohydrates: 21gFiber: 1gSugar: 6gProtein: 13g